Search This Blog

Contact me

Email sbeauchaine@kc.rr.com

Thursday, August 30, 2012

Make It Monday #80: Making Garland ~ Card 2


Ashley's our Make-It-Monday Gal this week as she shares her tips for making any shape into a trendy garland to put on your projects. We love anything that makes dies and stamps more versatile, so this tip is right up our alley.


This is actually my second card. I forget to post my second card first because I am a Ding-Bat! Anyway, the reason I made a second card is I felt my first card was a little crowded. I think this looks much better.
This card uses Sweet Baby stamps and dies. Fine Linen, Harvest Gold and Spring Rain ink. The background  panel is Bitty Dot and the Mat is Mega Mat Stack 4. I have a tip. If you are layering these cuts between twine use PTI card stock. I get a little cheap and try and use my Wal Mart stock and the twine showed a bump along the die cuts. I just re-cut them with PTI paper, stamped and re-layered them ~ problem solved. I think this makes an ADORABLE card!
Thanks Ashley for a fun Make-it-Monday!
Thank you for looking at my blog!
Susan


Make It Monday #80: Making Garland


Ashley's our Make-It-Monday Gal this week as she shares her tips for making any shape into a trendy garland to put on your projects. We love anything that makes dies and stamps more versatile, so this tip is right up our alley.


I love this idea! I have been wanting to make some Flip Flops with my Flipping Out die and the cork sheets I uncovered in my cleaning last week! Soooo, here is is. I felt I needed to make 3 sets of flip flops but it is really tight across the card. I probably should have made the card a greeting sized card for the extra space. I used Bitty Dot paper as the background panel and the scallops are from the Heart border die. I just used scraps on my desk for the flowers on the flip flops. (The purple one is from the band from Natural Beauties stamp packaging!) The sentiment is from Simple Sunflower set on a Tiny Tags.  
Easy Peasy!
Thank you for looking at my blog!
Susan

Wednesday, August 29, 2012

The last 2 Simon Says Stamp Cards


I love the color of the paper on this card, but I wonder if it is a little more feminine that the others? Yes? No? Anyway there was a sheet of this awesome Chevron in the kit. I used my PTI Chevron die and cut a white strip to go over the seam. I "Dove-tailed" the sentiment box by using my square punch. It works pretty well if you are a little patient with it ;) The sentiment is inked in Simply Chartreuse. That is it! SUPER simple. Oh, the chevron along the bottom of the sentiment is the piece that cuts when you butt the 2 dies next to each other! A BONUS cut!


This card uses the blue chevron paper and the denim paper from the kit. I used my Spiral Notebook Page die and cut a piece of Basic Grey "notebook" paper. I inked the edges in Enchanted Evening. The sentiment is stamped in Enchanted Evening on a cream Christmas Label die cut. A star punch was used to cut the denim paper. I popped it up. Another SUPER simple card!
I got the SWEETEST email from one of Colin's friends thanking me for the card I sent him! That just ROCKED my day :) That is one of the reasons we do this ~ right?
Thank you for looking at my blog!
Susan

Sunday, August 26, 2012

2 More Simon Says Stamp Card Kit Cards


Here are 2 more cards I made for Colin and his friends. This paper also came from the SSS kit. Chevron and Denim, both make a masculine cards, to me! The top card uses PTI Chevron die that was used to cut white card stock. I added a Basic Grey star stamp, I thought it needed 3! The tag is Tag Sale #6 & a little piece of raffia ~ that is masculine, right? The ink is PTI Harvest Gold.


This card used the Wine Bottle Tag Die that was used to cut white card stock. I trimmed off the "hang" part. A strip of Washi tape is across the top. It is a HAPPY DAY for me when I use Washi tape. I have accumulated a stack and rarely use it, so when I do ~ WooHoo! All 3 of these star stamps are from the SSS kit. I punched a star from the denim paper and popped it on top of the circle of stars. The ink is Enchanted Evening. Another super simple card.
Colin came home Friday and left late last night. It was so good to see him. Of course he brought laundry, but I was HAPPY to do it ;)
Thank you for looking at my blog!
Susan

Saturday, August 25, 2012

August 2012 Blog Hop


                              Blog-hop-1
                                      Blog-hop-2
This month's inspiration is all about autumn patterns, textures & textiles.  Think warm & cozy woolens, houndstooth, tweed, burlap, felt, corduroy. herringbone and even argyle.  You can create your own custom patterns & textures with stamps or impression plates.  Or you can incorporate actual fabrics, felt, yarn and other textiles in a creative way


My take. I used my new Herringbone stamp. I am not going to lie, I had trouble with it. I cleaned it, re-positioned it on the block, I had trouble. I finally got my brayer out and that helped a LOT! My 4 1/2x5 1/2" white card stock base had the front embossed with the Herringbone Impression Plate. I took a 4x3" piece of white card stock and stamped the Herringbone with Fine Linen (my fave!) I adhered it to the top of the card front. Tag Sale #5 that was also embossed with the Impression Plate was added. I used Enchanted Evening to cut the Filigree Border die and Bloom Builders #3 Die. The bloom was threaded with a Dark Chocolate button. A strip of that card stock was also adhered to the bottom of the herringbone piece. A Vintage Cream Christmas Label Die was stamped with Enchanted Evening ink. Finally to add more texture and incorporate some felt I took my standard size hole punch and cut some Dark Chocolate felt to add to the centers of the Filigrees. It cut pretty well I did have to trim off some fuzz as the punch isn't all that sharp. 
LOTS of texture! Pretty fall colors ~ Fall cannot get here soon enough!
Thank you for looking at my blog!
Susan

Thursday, August 23, 2012

Make It Monday #79: Fabric Die Cuts


Melissa Phillips is making her Make-It-Monday video debut with a handy little tutorial about using fabric with your dies. It opens up a whole other world of texture for your projects.


edited: I tell a story of my sons old boxer shorts. I got ahead of myself and didn't mention:
1. I threw out the boxers due to my poor cutting technique!
2. This fabric is NOT old boxers! My boys would have never worn those!!! 


I hate posting 2 cards on the same day. But I got my Make it Monday done and the Blog Hop is Saturday, so.....
I REALLY wanted to just copy Melissa's card ~ I LOVED it, but I refrained. I went to my old standby, Mat Stack 3. It layers so nicely.
OK, true confession time. I don't sew so I have very little fabric. I had a bunch of my boys old boxers that had patterns that I liked so I saved them! They were washed, so DON'T judge me! I had a TERRIBLE time cutting them with my dies because, well I was stupid and did not know you needed to back the fabric! THANK YOU, Melissa! I am so happy. I have a can of spray adhesive (that I haven't used in 10 years because it is messy and smells bad!) but let me tell you it works like a charm! I had this piece of fabric and it cut like buttah! I will definitely buy more. 
The card base is 4 1/4x5 1/2 white card stock. I layered a piece of Enchanted Evening card stock that I had stamped with Damask Designs in VersaMark. I used my card stock backed fabric to cut Mat Stack 3 & the large and small Notched Flower die. The Medium was used to cut Enchanted Evening card stock. They were layered and an Enchanted Evening button was threaded and adhered to the flower. Signature Greetings II was inked in Enchanted Evening ink. A satin bow was tied around the base of the embellishment. 
I cannot wait to get some really pretty fabric and make the card Melissa did with the Fabulous Frames die that I just got in my order yesterday!
Thank you for looking at my blog!
Be sure and look at my Foodie Chocolate bar card I posted earlier!
Susan

Trying to beat my Sister Pat!!!


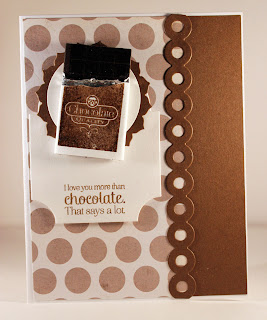
I just got my August PTI order late yesterday afternoon! My Sister Pat * Hi Pat* got hers on MONDAY!!! Soooo unfair. So I made a card lickety split! We both ordered Dawns Foodie set mostly because of the ADORABLE Chocolate Bar. Colin, my baby ~ the one who just left for college :( ~ LOVES Chocolate! He loves Godiva but he also fond of plain 'ole Hershey Bars! So.... I had to get a card made and in the mail before Pat beat me to it. I tried to copy Jessica Witty's card. I actually made most of this card yesterday but wan't all that happy with it. So, this afternoon I remade the chocolate bar. It is better, but.... The only chocolate brown ink I have is PTI. It doesn't emboss that well. I tried to ink with VersaMark first and then the brown ink. It took MULTIPLE tries and this was the best one. I used 5 chipboard cuts of the candy bar and used Scotch Quick Dry glue to adhere them together. A dark brown piece of cardstock was inked with VersaMark and clear embossed. I also would uses a lighter color of brown. Probably PTI Dark Chocolate. I was looking for a Hershey color. In person you can see the segments of chocolate but not in the pictures. I took typing paper and stamped the image again and did my clear embossing. You cannot see it at all in the picture. I trimmed it up, cutting off the segment part, and adhered it to the bar. The card is ADORABLE but I can do better and clean up my first time mistakes. I just HAD to get mine in the mail first! ( Don't tell Pat!!!)
Thank you for looking at my blog!
Susan

Wednesday, August 22, 2012

Another Simon Says Stamp card


First of all, the top card is the same one I posted before. I thought I did a poor job of editing it. I added too much light and washed it out. It is soooo much cuter in real life, so I re-edited it. Not sure if it looks any better.
The second card makes me happy! I LOVE that sentiment! Again, looking for a boy theme here. Wood pattern always scream boy to me. Last month I finally broke down and ordered the PTI Woodgrain Impression Plate. I had an OLD Fiskars plastic plate that broke and I was making do. WOW, I got much better impressions with the new one. I knew I would, but it is so hard to go back and order older stuff when they tempt us EVERY month with awesome new things! So, I used my staple Half & Half die, the impression plate Fillable Frames #11, a 1/2 & 3/4" circle punch, and a star stamp from Tim Holtz. SUPER simple but I think masculine and conveys the message I wanted to send! I am so missing all of those boys!
Thank you for looking at my blog!
Susan 

Monday, August 20, 2012

Cards for Boys away at College


If you read my blog at all, you know that Colin, my youngest, just left for College on Friday! It is so QUIET here! I not only lost him but his friends as well. Our house is the "Hang-out" spot. We have a great basement with a 60" flat screen so there are lots of Xbox challenges and we also have a Ping Pong table that has more than paid for itself! Lots of fun, noise and food have passed through that basement. It was also the hang-out place for Brandon, the middle one. It wasn't as bad when he left because Colin & his friends took over. Now..... quiet!
So, I am going to TRY and send an occasional card to Colin and some of of his friends that are my favorites. I have a ROOM FULL of cards but I am not always so good at sending them ~ now I have fewer excuses!
I am a "charter" member of Simon Says Stamp Card Kit of the Month.

*Simon Says Stamp Card Kit of the Month September 2012 YOU'RE AMAZING

I keep thinking I will cancel the membership so I can use those $$ for some old PTI things I never get around to buying but this months kit is awesome. The stamp set which you can buy for $14.95 is PERFECT for making the cards I want to send to the boys. We all know how difficult it is to make cute masculine cards. If these were girls ~ easy peasy!
So.... I made a series of 6 cards yesterday, 2 of each. I LOVE 6x6 paper because of the scale but I think it can be wasteful if you are making note cards. So what I do is trim off a little more than 1/2" and then cut that piece in half giving me 2 3x 5 3/8" pieces. I then piece those with a solid (usually) piece that is a little more than 1x 5 3/8". I like that look anyway, it adds interest. Sometimes I use a panel that is 4x5 3/8 depending on the card. I fret over those wasted pieces, though ;) I LOVE this black paper. I would love the have more of it. VERY masculine. I covered the seam with a cut using black card stock and my Super Star Borders Die.  It could not be more PERFECT with these Star themed stamps. I used my Spiral Notebook Page die and cut a piece of Basic Grey notebook style paper (again PERFECT) and stamped the 2 sentiments in True black ink. I used another section of the Super Star Borders cut. I also have an old star punch I cut the black paper with. I adhered all but the star punch directly on the card, I did pop the star up. These are boys here, no need in spending extra postage :) 
I will post the rest of the cards in 2 posts. This one got a little long. I wanted you to know about the SSS Kit. 
So... the empty garage space will become less obvious over time (I hope!). I will get used to the quiet         (I hope!) Life goes on :(
Thank you for looking at my blog!
Susan


Sunday, August 19, 2012

6x6 Paper Cards


Here are some more cards from my 6x6 paper marathon. Do you get on kicks? I might have asked this when I got onto the Filigree Border die kick ~ not sure of that or not. My next on might depend on my new PTI order. I am hoping it will be here Wednesday! 
The top card uses some lace trim, Turning a New Leaf, Doily Details and a butterfly stack. The middle one adds Limitless Layers Oval, Double Ended Banner and a few Butterflies from a Martha Stewart punch. The last one adds Notched Flower die. 
Well, I survived Colin leaving ~ sort of! I mean, what choice is there! My house is so quiet! Al goes back to Charlotte tomorrow so It will catch up with me a little more. Colin will be home Friday for his last indoor soccer game ~ YEAH! The good thing about having Chiefs season tickets is both he and Brandon come home for those, tho they rarely stay long enough :(  I know I will adjust ......
Thank you for looking at my blog!
Susan

Saturday, August 18, 2012

LOTS more Webster's Pages paper cards


These are all 4 1/4x5 1/2 note card sized.   I am not sure how I made cards before I got Half & Half dies. I use them ALL THE TIME! They make great focal points to ground an embellishment or as a sentiment box. I also use the Jar Label die a lot. If I have a little scrap of paper I like I frequently will go ahead and cut it with the Jar Label die and put it in a little container, I always have those cuts for a small sentiment. The green, turtle card has a little bling. It came from a 12" strip that was in my warehouse sale box. 
Another little batch of "Victorian'ish" cards. I kept them simple, showcasing the paper.
Thanks for looking at my blog!
Susan 

Tuesday, August 14, 2012

Webster Pages Warehouse Sale Cards


Back in June Webster Pages had the sale where you spend $39 and you get a box worth over $100. I was hoping for a box full of Sparkles and trims. I did get a LOT of trim and some sparklers and either 4 or 5 packages of 6x6 papers + 12-15 12x12 papers. All in all a VERY good deal! The shipping was $9! The papers are very Vintage/Victorian to me. This is a look I like but I would never sit down and pick out these papers. I sometimes think a sale like this is good for stretching my comfort zone. As you probably know, Dawn McVey is my stamping IDOL! I have patterned my style after her. I LOVE Melissa Phillips but I could not pattern my style after hers. Dawns was much more like mine to begin with. Melissa's designs though GORGEOUS are too complicated for me. They have too many steps, and I have ADD! So, these cards are MORE Shabby Chic/Vintage/Victorian than my normal style, but, they are still my style. Does that make sense???
These cards are all 5x7 Greeting Card size. The papers were trimmed, and the extra piece or a contrasting piece was added to the bottom. The top card was interesting. It had 2 edges that had cool elements, so after MUCH deliberation I cut it apart and adhered a seam down the left side. I was going to cover it up (You know my issue with seams!) but that just made it more obvious, so... I left it! I used  PTI dies to make minimal embellishments and some bling (for you, Pam)! 
I have more to share, I made a LOT from these papers!
Thank you for looking at my blog!
Susan